
Manual Lens Distortion in Fusion Studio
Manual Lens Distortion solving in Fusion Studio
Fusion studio 21.1 Update has just been released with a ton of great updates some of which I have been directly asking the Blackmagic Design folks whenever I’m at NAB or emailing them directly.
NAB 2026
Blackmagic Design at NAB 2026
One of the things I want to talk about here is something that has been in Nuke and I have always wanted it in fusion and that’s manual lens distortion solving.
I am often given shots to work on where I need to track and paintout or composite something into the shot that was an after thought or never planned to need it in the first place. So lens profiling or solving for lens distortion data never gets to me. And I never get a checker chart for solving it myself.
Now we have both an automatic as well as a manual lens distortion solver. I want to cover the manual solver here because it’s the one I’m the most excited about using and experimenting with.
What is solving for lens distortion?
If you’re not familiar with solving for lens distortion this is the process of removing any warping that camera lens adds as the image is passing through to the sensor, this is generally easier to see on a wide lens with a large field of view and gets less noticeable on longer telephoto lenses but it is always there to some extent.
To “solve” it, is to apply a variable distortion to the image that counteracts what the lens is doing, so when a pole or building in frame appears to bend when it should appear as a straight line, this will correct it to make it straight.
You then do all your compositing on this corrected version of the shot and then at the end you add the inverse of the distortion you applied to take it back to how it originally looked, this time its warping the newly composited pieces of your composite with it, so everything gets the exact same distortion treatment.
What does this do?
This essentially straightens out your footage while you work on it when it comes to 2D tracking and 3D tracking and it pushes anything you are compositing into the shot into a more realistic look, emulating it being filmed by the same lens. This then eliminates tracks and composites that tend to slip or slide, drawing attention to something that it shouldn’t for a viewer.
Where to find Manual lens Distortion solving in Fusion
You’ll need to be on at minimum Fusion Studio 21.1 September build to access this.
https://www.blackmagicdesign.com/support/family/davinci-resolve-and-fusion
Step 01
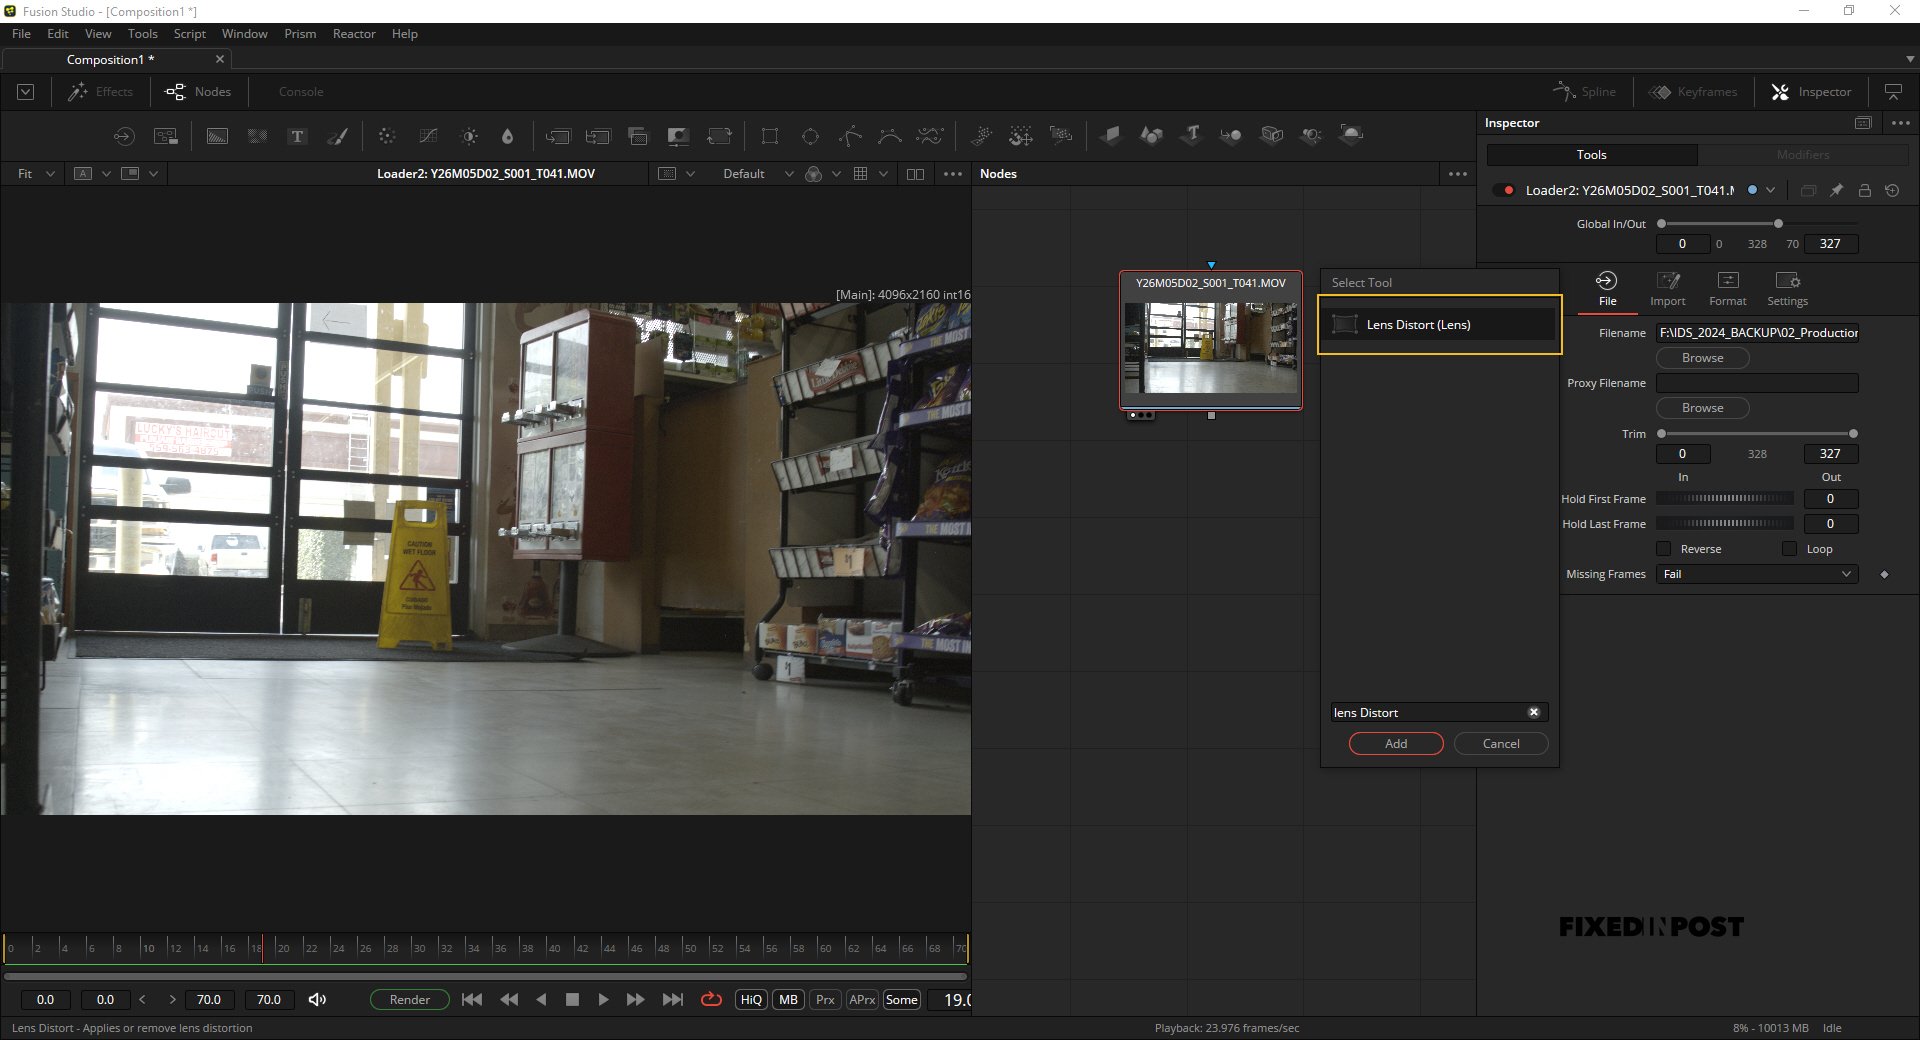
Create a Lens Distortion node
Step 02
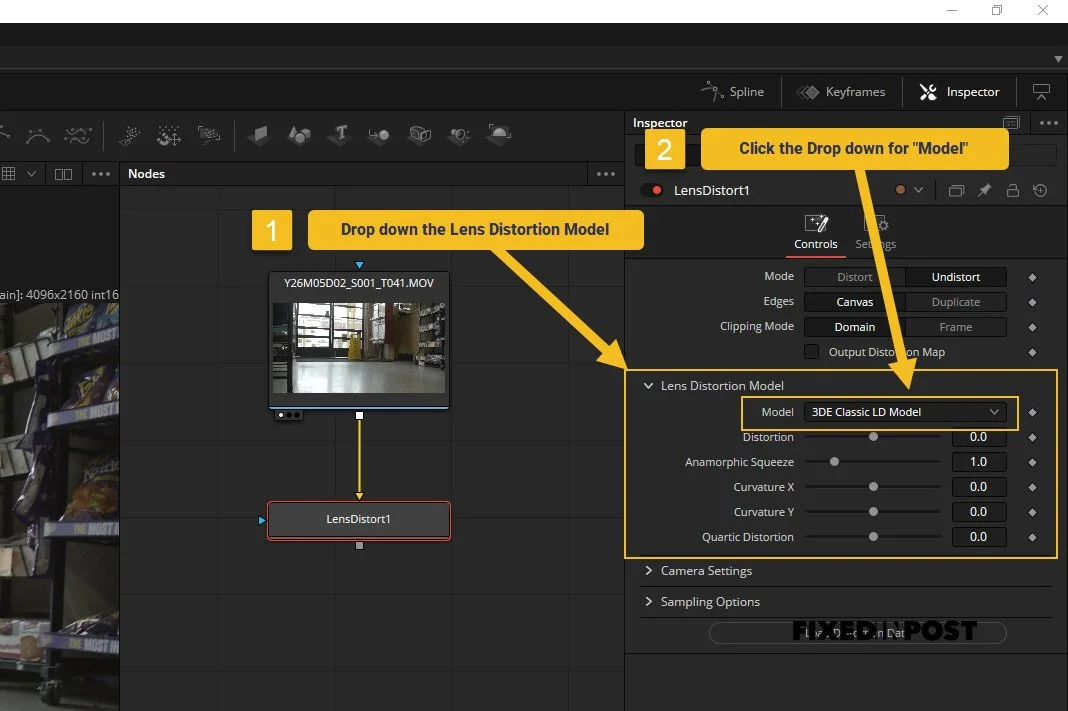
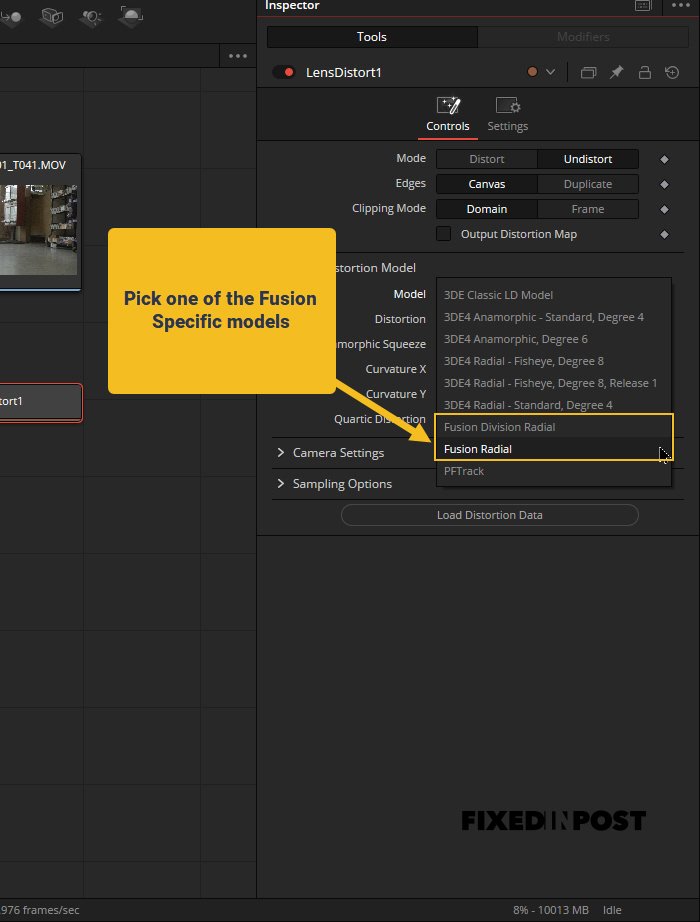
Click the Lens Distortion model Drop down and change the model from “3DE Classic LD Model” to one of the “Fusion” specific models.
Step 03
Select “Fusion Division Radial” or “Fusion Radial”
Step 04
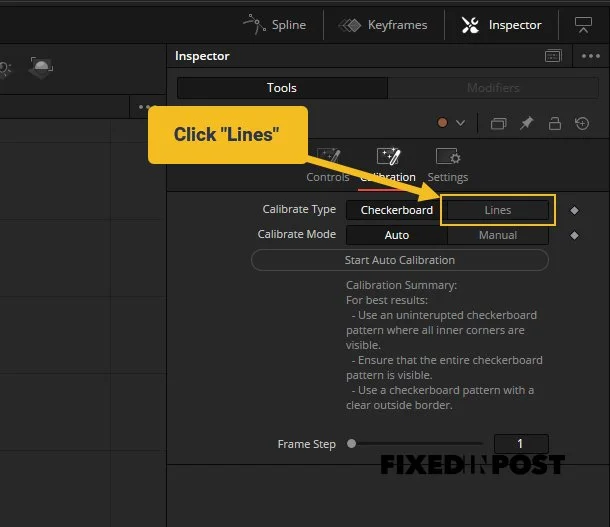
Select the “Lines” option in the “Calibrate Type”
Step 05
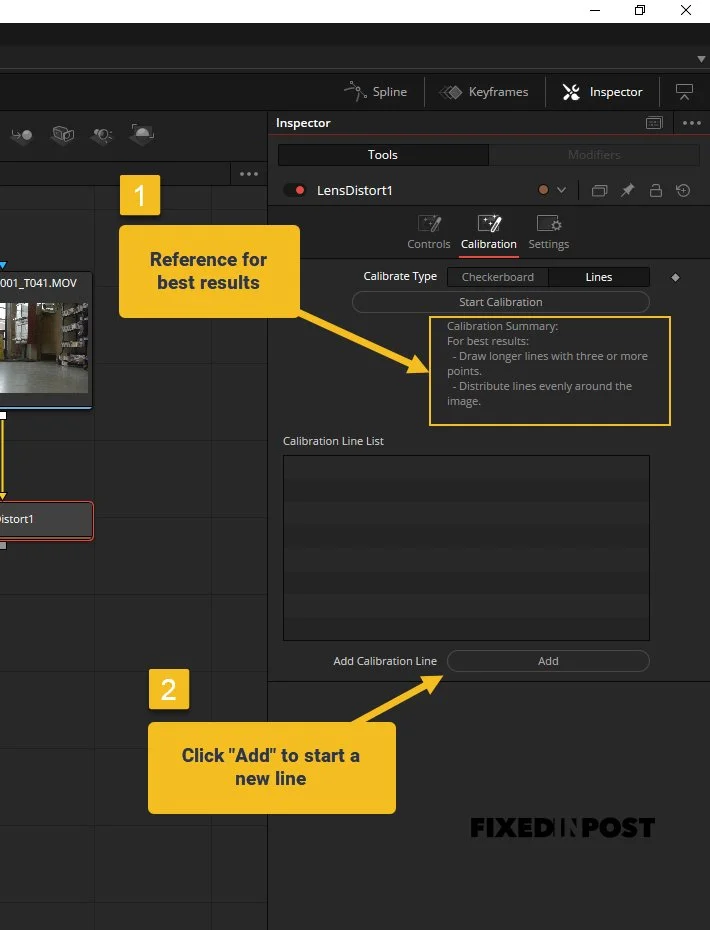
Refer to the helper text for creating lines that will help you calibrate for the distortion and then click “Add” to start creating a Calibration Line.
Step 06
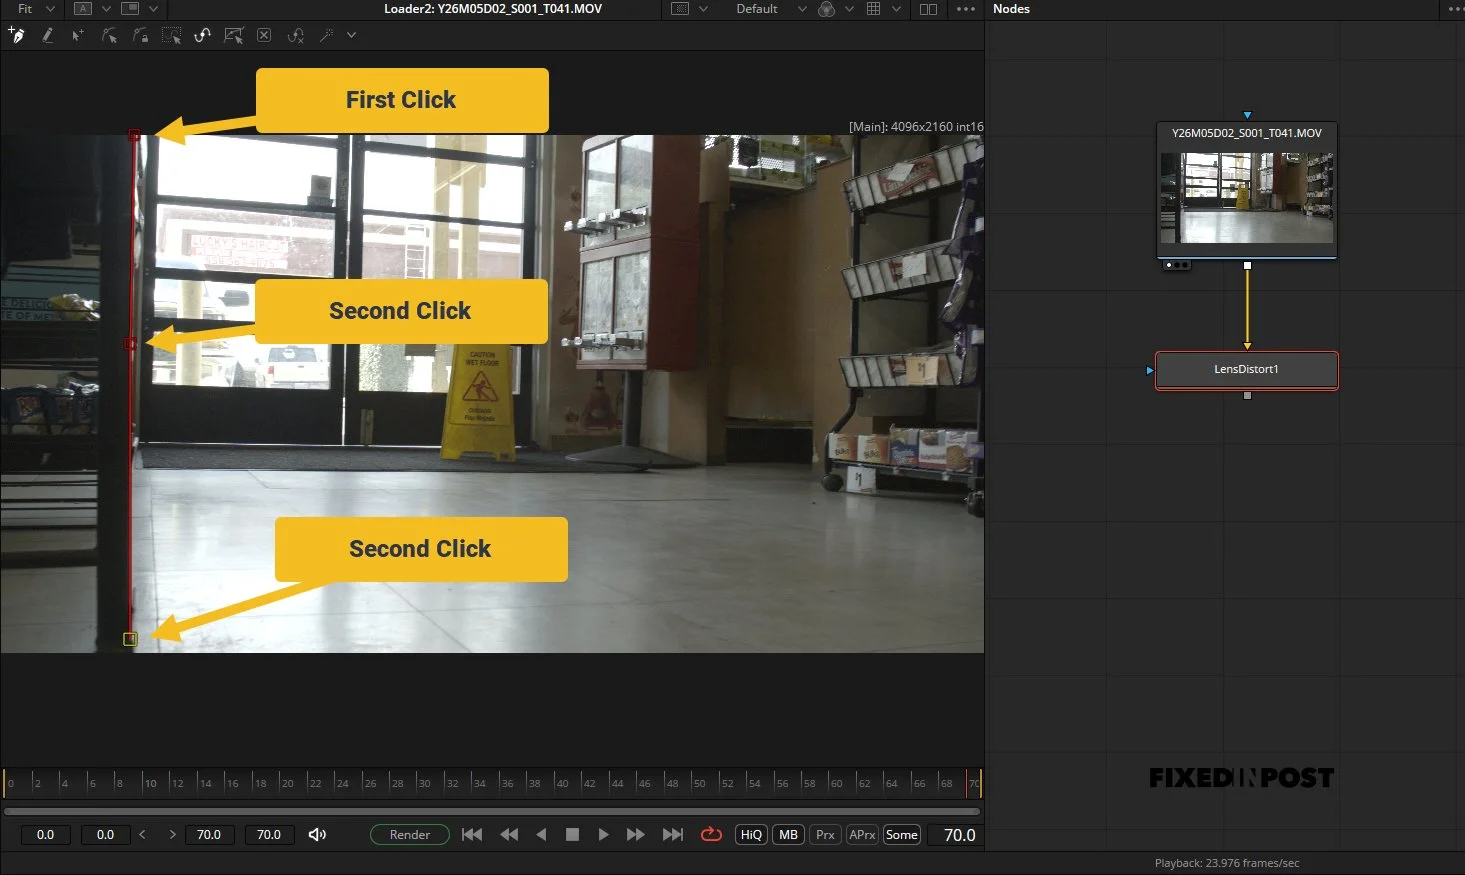
Pick a line that runs Vertically, Up and Down, or Horizontally, Left and Right in your frame. One that you know for a fact is a straight line. This is where you would look for something like a building edge or pole, you know these have to have been built as straight as possible.
The longer line you draw the more points you should include to capture as much curve as possible. Im selecting a pole on a shelf that I know is a straight line. The more accurate your lines on things that should create a straight line, the better your undistort will be.
Step 07
When you’re done making a line, hit the “Add” button again to start creating another line.
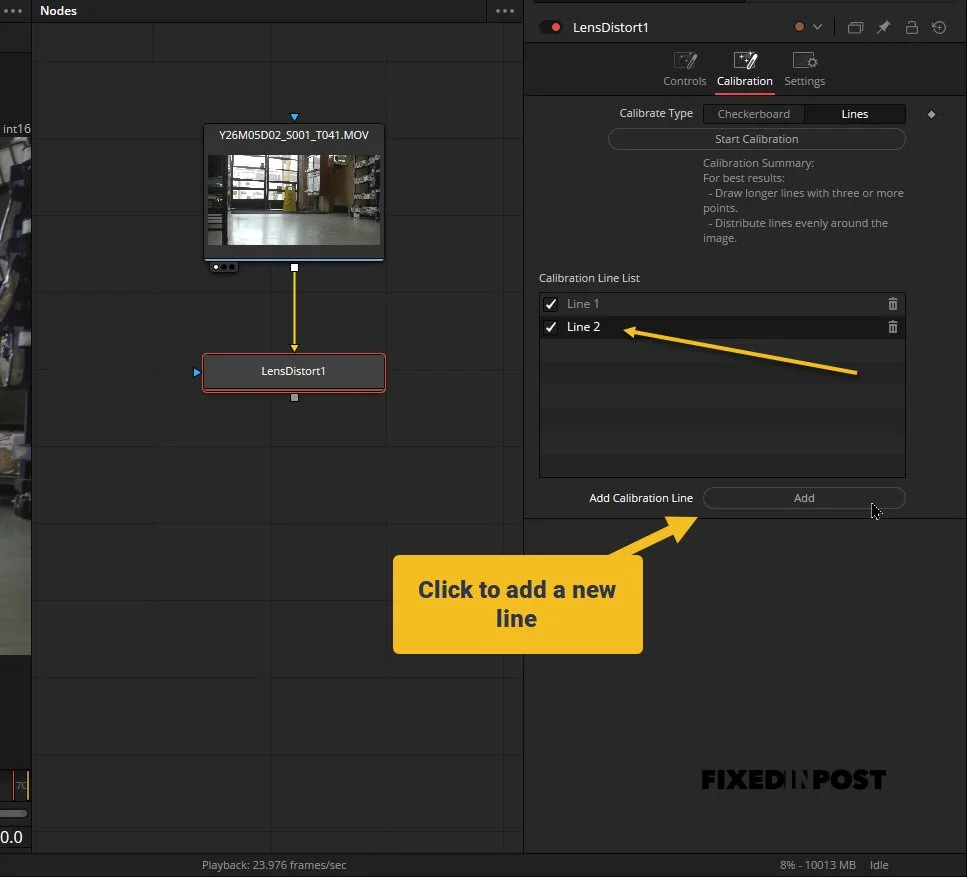
Step 08
Create another line picking another line in frame, I’m going to follow along this door edge, I know a door should be straight. I’m also favoring the edge of frame as much as I can as that is where the most distortion is.
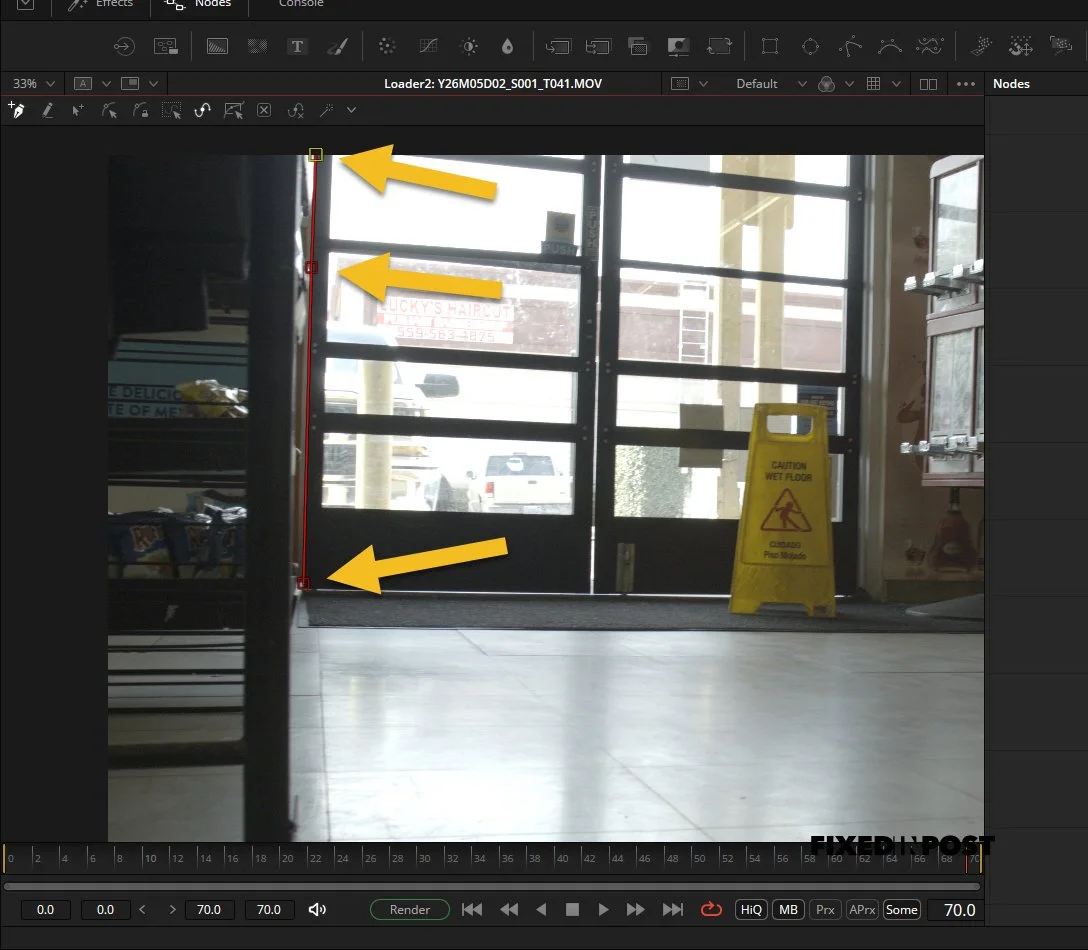
Step 09
I’ve continued to add more lines throughout my frame, there aren’t many options on the right to draw out lines since a lot of the information there can’t be trust as accurate for calculating the distortion. There are also a lot more lines I can draw here but I stopped here.
Once you are done drawing lines and ready to move on, click the “Start Calibration” button.
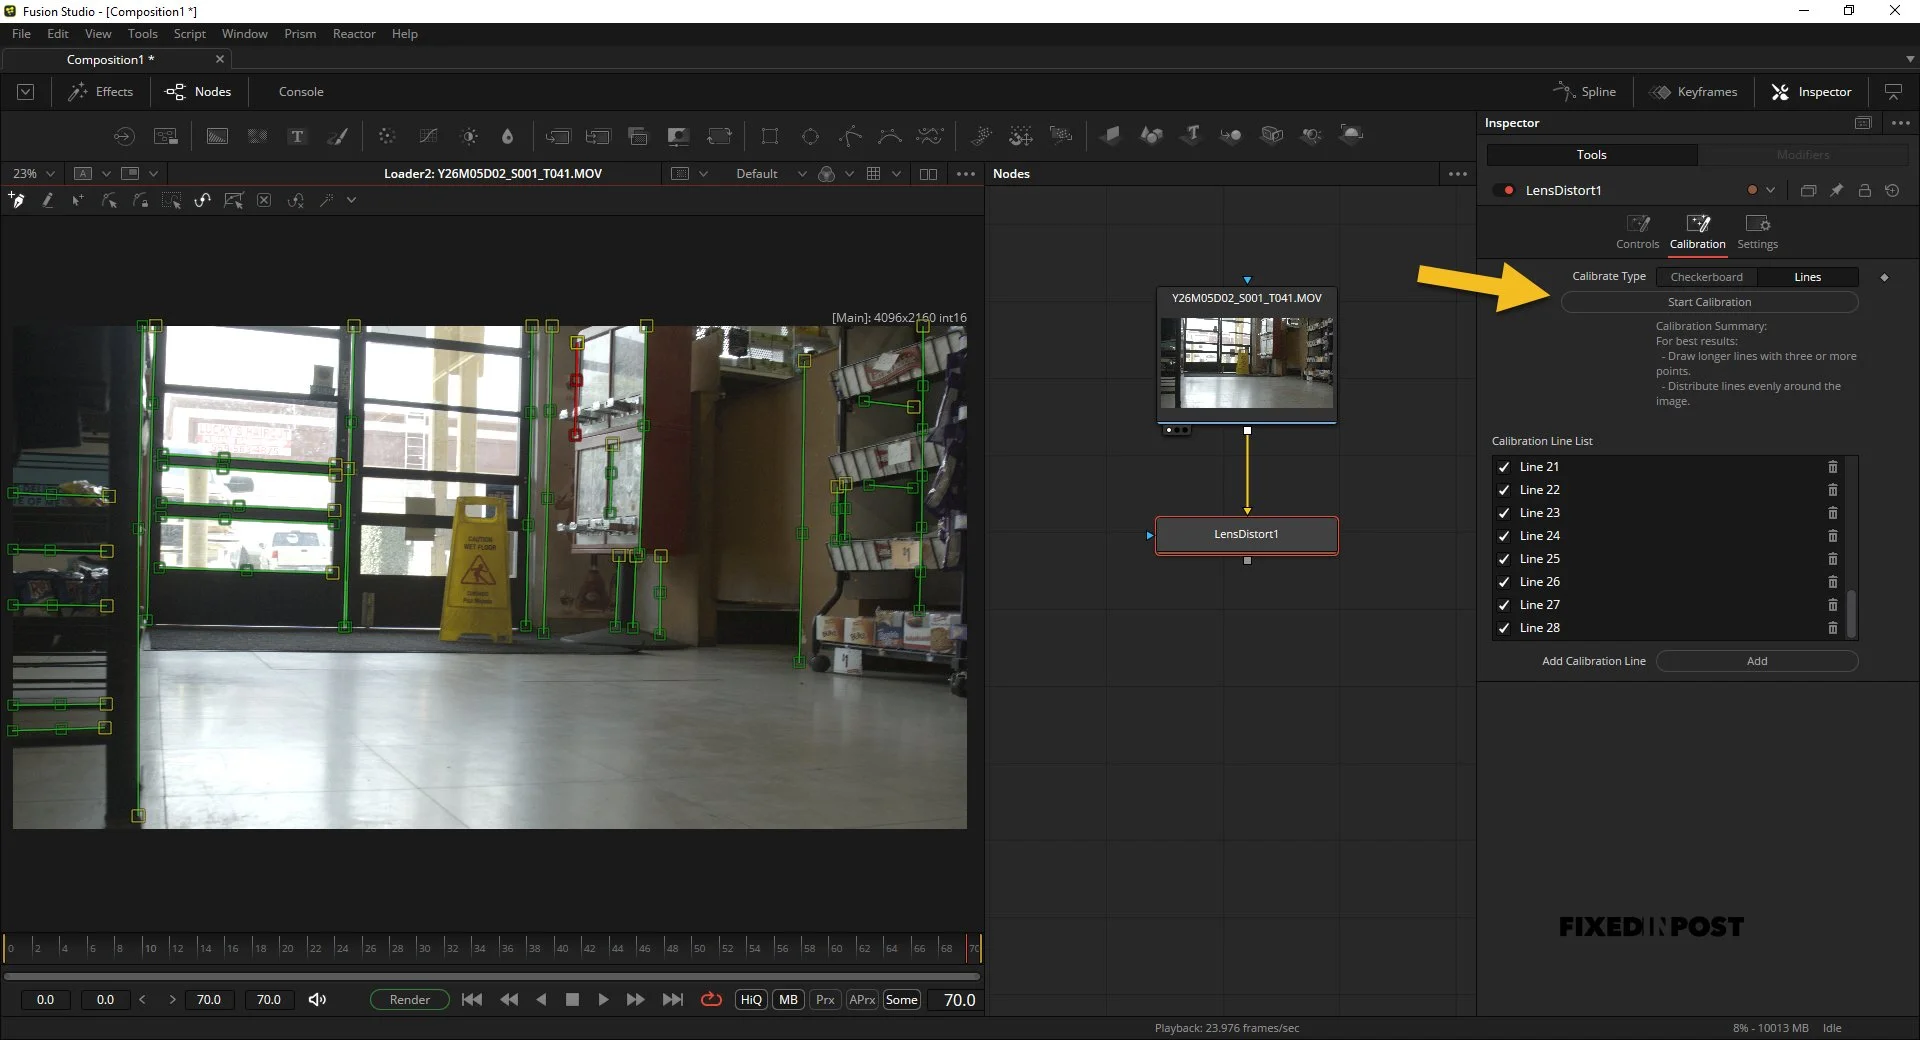
Step 10
You can see the “Calibration Summary” here with all the information, notice that it rejected some of my lines that where too long and didn’t have at least 3 points.
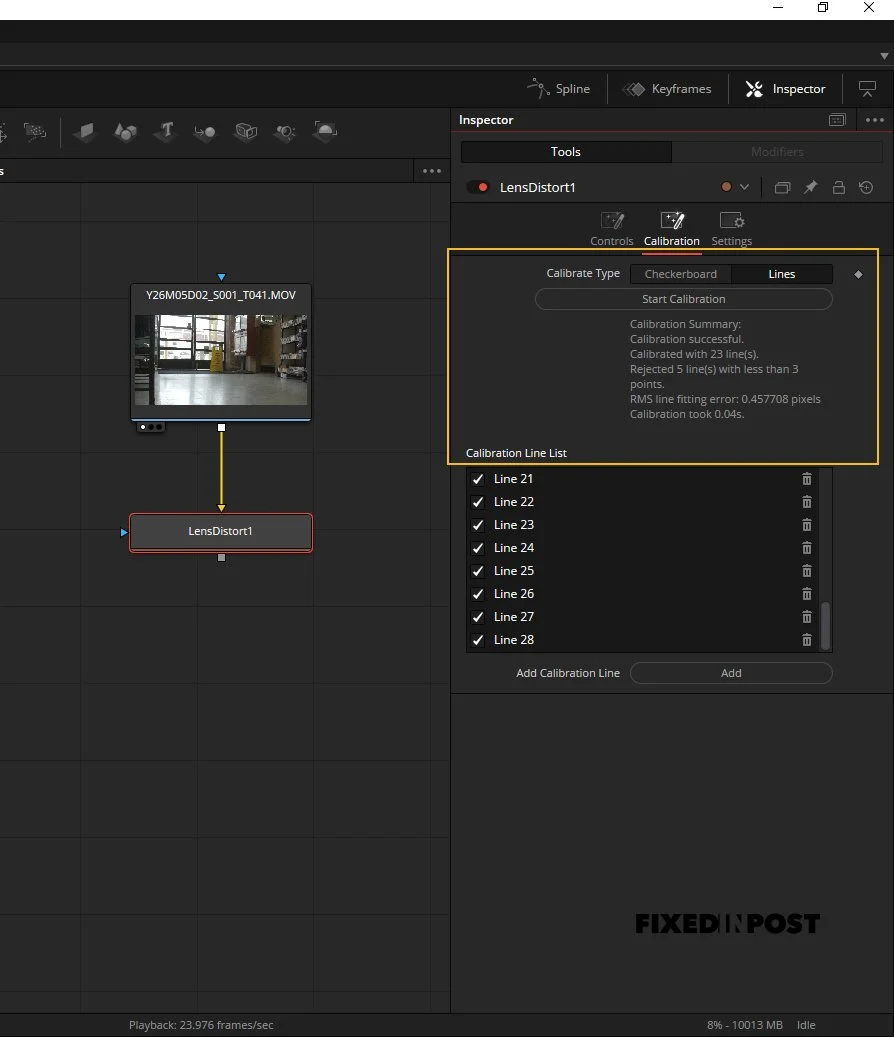
Step 11
Check the before and after of your distortion to see how the lines straighten out. This is me enabling and disabling the Lens Distort node.
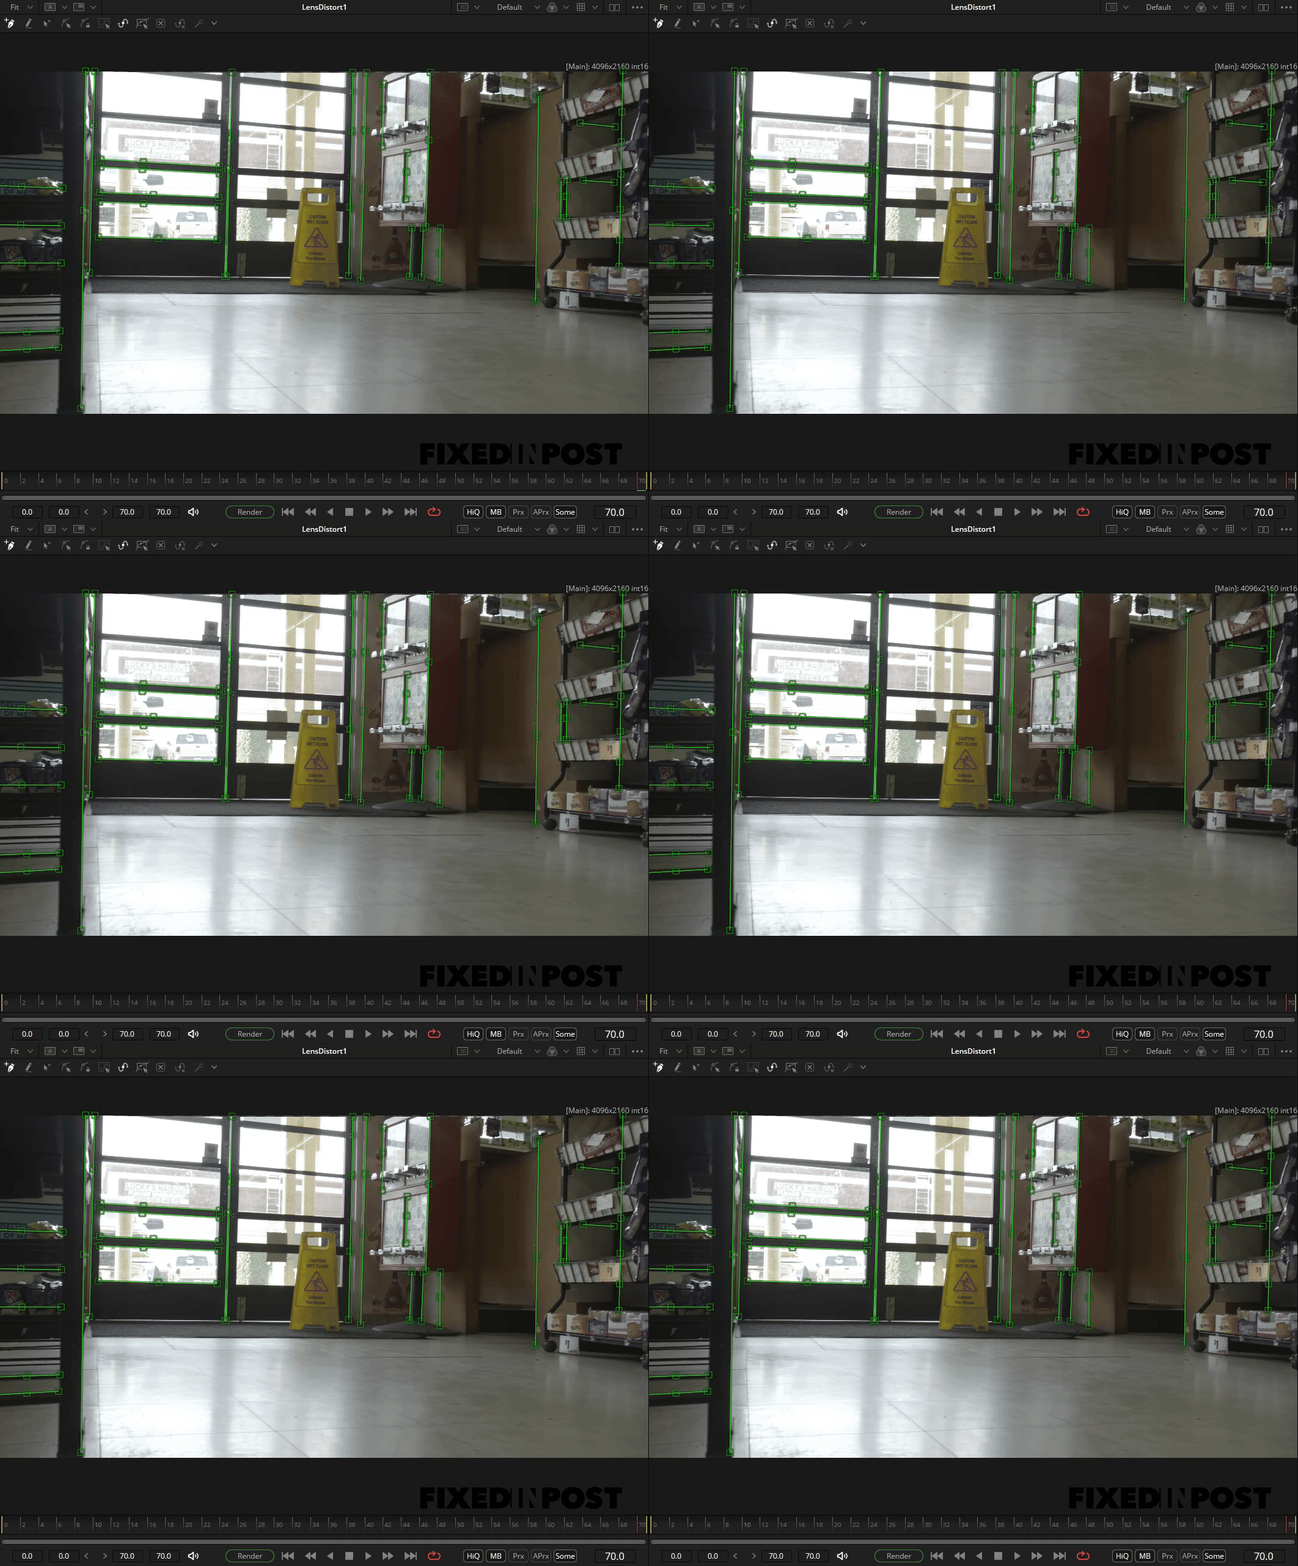
Step 11
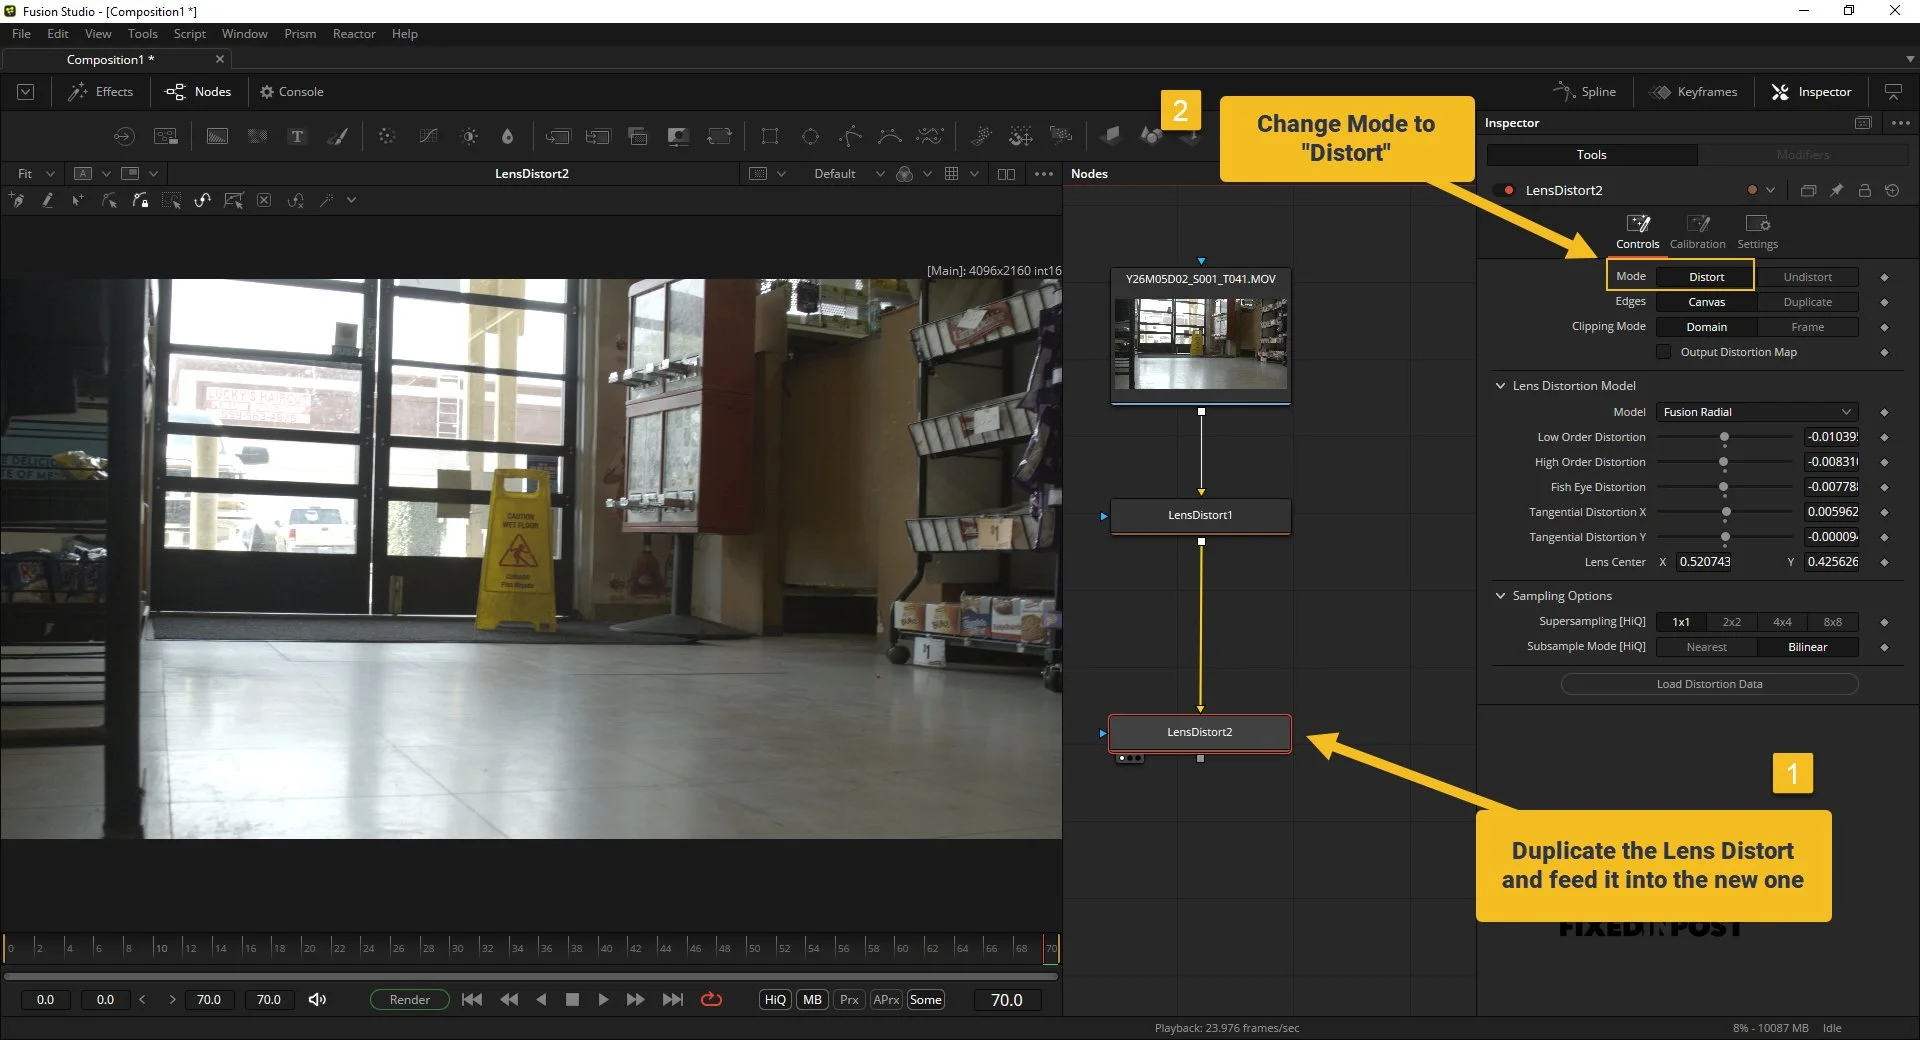
Once you are happy and done with your Un-Distort you can now do all of your compositing after the lens distort node. Once you are done adding to your composite copy and paste the Lens Distort node below and pipe the output of the first Lens distort Node into the copied one. Then change the “Mode” from “Undistort” to “Distort”.
This should now look like your original footage because we have undistorted the footage then re-distorted it by its exact amount so it nullifies itself along with any work between it.
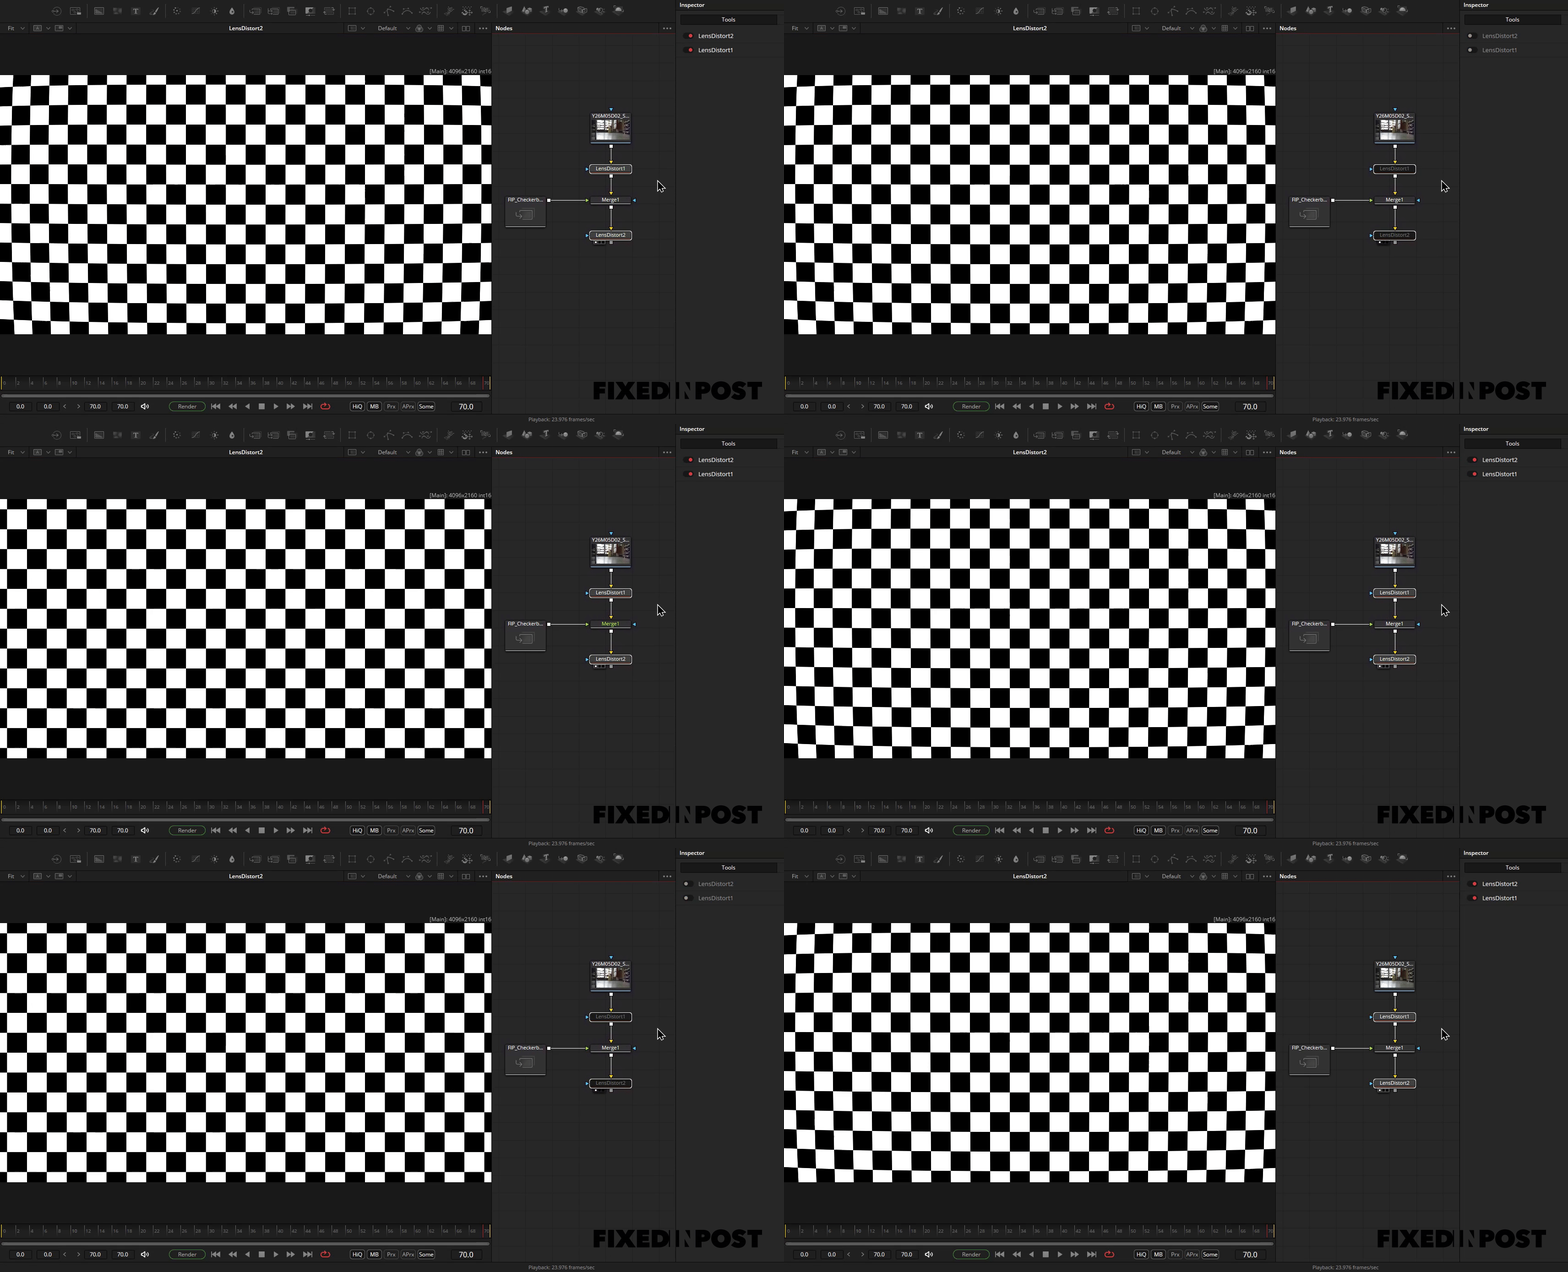
Here you can see I added a standard Checkerboard into my composite with it sandwiched between both Lens Distortions. You can see how it takes on the Lens Distortion that we solved for.
Why solve your lens distortion
This is a crucial step to any vfx process, even doing simple paintouts, solving for lens distortion can make your work look overall better but also easier for you.
Most of the time you can get away with not solving for lens distortion when working on something in the center of your frame, but once this migrates across the frame or slide towards the side, you’ll always some level of sliding or slipping in your composite, because what you are comping in isn’t subtlety warping with your footage the way it was shot, so it might look ok in one of part of the shot, but then not look correct as the shot progresses.
Making sure to un-distort your footage, process all of your comping and then re-distorting your image is one of the quickest and easiest ways to make your work look the best it can.
What you can do next?
For efficiency, the next thing I would do is, if you are shooting your own work you can go through and either shoot charts or pick a subject that has lots of straight lines and go through all of your lenses and build out a library of lens solves for each lens if you are shooting with Prime lenses that don’t zoom.
So you can for example have a folder of .Setting files that would be “24mm_SonyA7.Setting” or whatever you’re shooting with and that way whenever you shoot something in the future you can just bring in that previously solved lens data and start working right away.
This would essentially be a macro just containing the one specific Lens Distort node, no need to have it be in your macros, but just a folder next to your fusion comp project files where you can just drag the file in from your explore window directly into your comp.
Lens Distortion Preset Examples
24mm_SonyA7.Setting
35mm_SonyA7.Setting
12mm_REDDragon.Setting
50mm_SonyFS5.Setting
You just need to make sure you are keeping track of the specific lens on the specific camera body. You can’t solve a lens on one camera and then apply it to a different camera shot even if they used the same lens, because they most likely don’t have the same sensor sizes.
Another thing to note is that some cameras like the RED can shoot in different resolutions by changing what part of the sensor is being used, so typically when a RED shoots at a higher frame rate it will crop in on the sensor to record a smaller frame resolution but more frames per second.
This should be taken into account when building a Lens profile library as it could change where the lens distortion is on the frame.
But once you have those variables locked down, they’ll never change. That lens on that specific camera will always produce that same lens distortion.
It gets tricky if you are working with zoom lenses because there’s not real guarantee that you zoom is set to EXACTLY 24mm or 35mm. You might be somewhere in the middle like 26.73mm and that would be impossible to get an accurate solve for each zoom level unless you were really really diligent onset about what zoom you set it to, so you are better off just manual solving each of those shots on the actual shot you are working on.
